Grinch Sugar Cookies-Festive Whoville Holiday Treats
Grinch Sugar Cookies are more than just a festive treat; they’re a delightful dive into holiday nostalgia and pure, unadulterated fun! We all have that one character who embodies the spirit of holiday transformation, and for many of us, that’s the Grinch. These iconic cookies capture that essence perfectly, bringing a burst of grumpy-yet-lovable green to your kitchen. What is it about these cookies that makes them so universally adored? It’s the perfect balance of sweet, buttery flavor combined with that satisfying crispness. But what truly sets these Grinch Sugar Cookies apart is their vibrant green hue and the irresistible charm they bring to any holiday gathering. They’re not just cookies; they’re edible embodiments of Christmas cheer, ready to melt even the iciest heart – or at least, yours and your guests’!
Get ready to spread some Grinchy joy!
Discover the magic of these beloved Grinch Sugar Cookies.
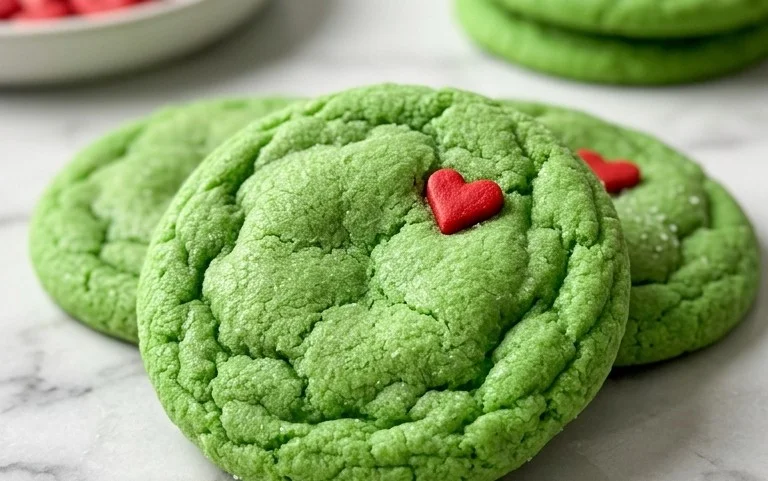
Grinch Sugar Cookies
Get ready to spread some holiday cheer, Whoville style! These Grinch Sugar Cookies are the perfect way to capture the spirit of the season with a festive, green twist. They’re surprisingly simple to make, and the vibrant green hue combined with a cute red heart sprinkle makes them an instant hit with both kids and adults. Imagine your cookie platter suddenly bursting with the unmistakable color of the Grinch himself – it’s guaranteed to bring a smile to everyone’s face. Forget the grumpy old Grinch; these cookies are pure, unadulterated joy. They have a delightful, slightly crisp edge and a wonderfully soft, chewy center, making them utterly irresistible. So, let’s get baking and make this Christmas a little greener, and a lot more delicious!
Ingredients:
- 1 stick (4 ounces/ 8 tablespoons) unsalted butter, softened to room temperature
- 2/3 cup granulated sugar, plus extra for rolling
- 2 large egg yolks (no egg whites!), at room temperature
- 1 teaspoon vanilla extract
- 3-5 drops green food gel coloring (gel is key for vibrant color without adding too much liquid)
- 1 1/4 cup all-purpose flour
- 1/2 teaspoon baking soda
- 1/4 teaspoon fine salt
- 12 red heart sprinkles (or more, depending on how many cookies you want to decorate)
Making the Grinch Dough
1. Begin by creaming together your softened unsalted butter and granulated sugar in a large mixing bowl. I like to use an electric mixer for this, starting on a low speed and gradually increasing to medium-high. You want to beat them until the mixture is light, fluffy, and pale yellow, resembling a creamy frosting. This process incorporates air, which helps create a tender cookie. Make sure your butter is truly softened – not melted. If it’s too cold, it won’t cream properly; if it’s melted, your cookies will spread too much. Scrape down the sides of the bowl occasionally to ensure everything is evenly incorporated.
2. Next, add the two large egg yolks and the vanilla extract to the creamed butter and sugar mixture. Beat again until well combined and the mixture is smooth. The egg yolks are crucial here; they contribute to the richness and chewiness of the cookies without making them cakey, which is a common outcome when using whole eggs in sugar cookies. Once everything is smoothly incorporated, it’s time for the magic ingredient – the green food gel coloring! Add 3 to 5 drops of the green food gel coloring. Start with 3 drops and mix thoroughly. If you want a more intense Grinch green, add another drop or two, mixing after each addition until you achieve your desired shade. Gel coloring is preferable to liquid coloring because it’s more concentrated, allowing you to get a vibrant color without altering the cookie’s texture by adding excess moisture.
3. In a separate medium bowl, whisk together the all-purpose flour, baking soda, and fine salt. This step ensures that the leavening agents and salt are evenly distributed throughout the dry ingredients, which is essential for consistent cookie texture and rise. Now, gradually add this dry ingredient mixture to the wet ingredients, mixing on low speed until just combined. Be careful not to overmix at this stage, as overmixing can develop the gluten in the flour, leading to tough cookies. You want to mix until no dry streaks of flour remain. The dough will be soft and slightly sticky.
Chilling and Shaping
4. Turn the green dough out onto a clean surface and gently bring it together into a cohesive ball. Then, flatten the dough into a disc, wrap it tightly in plastic wrap, and refrigerate for at least 1 hour, or until firm enough to handle. Chilling is a critical step for sugar cookies, especially when you plan to cut them into shapes. It solidifies the fat, which prevents the cookies from spreading excessively during baking, allowing them to hold their shape beautifully. The longer the dough chills, the easier it will be to roll and cut. If you’re short on time, even 30 minutes in the freezer will help.
Baking and Decorating
5. Preheat your oven to 350°F (175°C). Line baking sheets with parchment paper. On a lightly floured surface, roll out the chilled dough to about 1/4-inch thickness. For classic Grinch cookies, you can either cut them into simple circles or use a small heart-shaped cookie cutter. If you’re going for the iconic Grinch look, I recommend cutting out heart shapes. You can also use a small round cutter and then gently press a red heart sprinkle onto the center of each cookie before baking. If you’re cutting out shapes, keep the scraps together, re-roll them once, and then refrigerate again before cutting more shapes to maintain consistency.
6. Carefully transfer the cut-out cookies to your prepared baking sheets, leaving about 1-2 inches between them. If you haven’t already, gently press a red heart sprinkle onto the center of each green cookie. Now, it’s time to bake! Bake for 8-10 minutes, or until the edges are lightly golden and the centers are set. The baking time will vary depending on the size and thickness of your cookies, so keep a close eye on them. They should not be overbaked, as they will continue to set as they cool. Once baked, let the cookies cool on the baking sheets for 5 minutes before transferring them to a wire rack to cool completely. This allows them to firm up without breaking. Enjoy your adorable and delicious Grinch Sugar Cookies! They are perfect for holiday parties, cookie exchanges, or just a fun afternoon of baking with loved ones.

Conclusion:
These Grinch sugar cookies are truly a holiday delight! They’re incredibly fun to make, perfectly capture the spirit of the season with their vibrant green hue and adorable Grinchy flair, and taste absolutely delicious. The crisp edges and soft, chewy centers are a classic sugar cookie combination that everyone loves. Plus, the decorating process is an activity the whole family can enjoy, creating lasting memories alongside sweet treats.
For serving, these cookies are fantastic on their own, but they also make a wonderful addition to any holiday cookie platter. Imagine them alongside gingerbread men or peppermint bark! They’re also a brilliant choice for school bake sales, office parties, or as a festive gift for friends and neighbors. To add even more excitement, consider adding a sprinkle of edible glitter for extra sparkle, or using different shades of green for a more dynamic Grinch appearance. Don’t be afraid to get creative with your decorations – the more unique, the better!
I wholeheartedly encourage you to give these Grinch sugar cookies a try this holiday season. They’re simple enough for beginners but impressive enough for seasoned bakers, and the joy they bring is undeniable. So grab your apron, get your green food coloring ready, and let’s make some Grinchy magic!
Frequently Asked Questions:
Why are my Grinch sugar cookies spreading too much?
If your cookies are spreading excessively, it could be due to a few reasons. Ensure your butter is softened, not melted, and that you’re not overmixing the dough after adding the flour. Chilling the dough for at least 30 minutes before baking is also crucial for preventing spread and achieving that perfect cookie shape. Make sure your oven temperature is accurate as well.
Can I make the Grinch cookie dough ahead of time?
Absolutely! The Grinch sugar cookie dough can be made up to 2-3 days in advance and stored in the refrigerator. Just make sure to wrap it tightly in plastic wrap. When you’re ready to bake, let the dough sit at room temperature for about 10-15 minutes to make it easier to roll out. You can also freeze the dough for up to 2-3 months, thawing it overnight in the refrigerator.
Grinch Sugar Cookies
Festive and fun sugar cookies with a Grinch-inspired green hue, perfect for the holidays. These cookies are tender with a classic sweet flavor and a hint of vanilla. Includes red heart sprinkles for a festive touch.
Ingredients
-
1 stick (4 ounces/ 8 tablespoons) unsalted butter
-
2/3 cup granulated sugar, plus extra for rolling
-
2 large egg yolks
-
1 teaspoon vanilla extract
-
3-5 drops green food gel coloring
-
1 1/4 cup all-purpose flour
-
1/2 teaspoon baking soda
-
1/4 teaspoon fine salt
-
12 red heart sprinkles
Instructions
-
Step 1
Cream together the unsalted butter and granulated sugar in a large bowl until light and fluffy. -
Step 2
Beat in the large egg yolks one at a time, then stir in the vanilla extract. -
Step 3
Add the green food gel coloring and mix until evenly distributed and the desired Grinch green color is achieved. -
Step 4
In a separate bowl, whisk together the all-purpose flour, baking soda, and fine salt. Gradually add the dry ingredients to the wet ingredients, mixing until just combined. Do not overmix. -
Step 5
Chill the dough for at least 30 minutes. Preheat your oven to 350°F (175°C). Line baking sheets with parchment paper. -
Step 6
Roll spoonfuls of dough into balls and then roll them in the extra granulated sugar for sprinkling. Place the balls on the prepared baking sheets, about 2 inches apart. -
Step 7
Gently press down on each cookie with the bottom of a glass or a cookie cutter to flatten slightly. Decorate with red heart sprinkles while the cookies are still soft. -
Step 8
Bake for 8-10 minutes, or until the edges are lightly golden. Let the cookies cool on the baking sheets for a few minutes before transferring them to a wire rack to cool completely.
Important Information
Nutrition Facts (Per Serving)
It is important to consider this information as approximate and not to use it as definitive health advice.
Allergy Information
Please check ingredients for potential allergens and consult a health professional if in doubt.