Adorable Mini Pumpkin Pies Perfect For Fall Gatherings
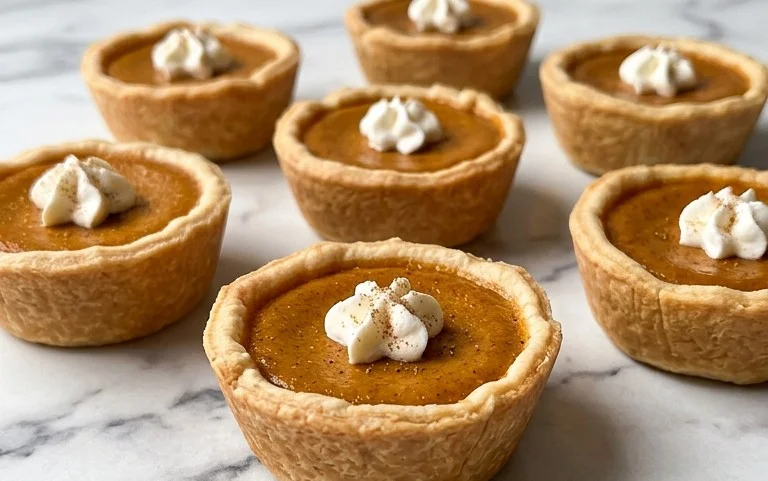
Mini pumpkin pies are about to become your new favorite fall obsession! There’s something undeniably magical about the arrival of autumn, and for me, it always centers around the comforting aroma of pumpkin spice wafting through the kitchen. While a full-sized pumpkin pie is a classic, these delightful mini pumpkin pies offer a perfect, bite-sized indulgence that’s just as satisfying. They’re ideal for holiday gatherings, potlucks, or simply a cozy evening treat. People adore them because they capture all the warm, spiced goodness of the traditional dessert but in an adorable, individual package. What makes them truly special is the ability to customize each little pie with a dollop of whipped cream or a sprinkle of cinnamon. Plus, they bake up so quickly, meaning less waiting and more deliciousness to go around!
Mini Pumpkin Pies
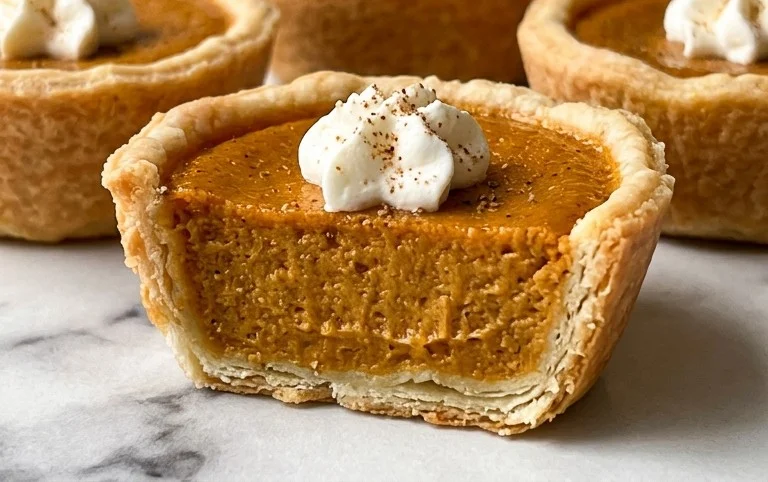
There’s something undeniably charming about mini pumpkin pies. They’re the perfect portion, eliminating the need for slicing and serving, and they look absolutely adorable on any dessert table. Whether you’re hosting a fall gathering, looking for a festive treat, or simply craving that classic pumpkin spice flavor in a more manageable size, these mini pies are a guaranteed hit. They boast a tender, spiced pumpkin filling encased in a flaky, buttery crust, and are best enjoyed warm with a dollop of homemade whipped cream. Making them is surprisingly simple, and the aroma that fills your kitchen as they bake is simply non-intoxicating. Let’s dive into how we can create these delightful little autumnal treasures.
Ingredients:
- 2 9-inch refrigerated rolled pie crusts (homemade or store bought)
- 1/3 cup brown sugar
- 2 tablespoons granulated sugar
- 1 1/2 teaspoons pumpkin pie spice
- 1/4 teaspoon salt
- 1 cup canned pumpkin puree ( (not pumpkin pie filling))
- 3/4 cup evaporated milk
- 1 large egg
- 1/2 teaspoon vanilla extract
- Homemade whipped cream (for topping)
Preparing the Crusts
The first step to creating our mini pumpkin pies is to prepare the pie crusts. Since we’re making mini pies, we need to cut out circles from our 9-inch pie crusts. For this, a standard biscuit cutter or even a wide-mouthed glass or cookie cutter works perfectly. I typically aim for a cutter that’s about 3 to 4 inches in diameter. If you’re using store-bought crusts, gently unroll them onto a lightly floured surface. If you’re using homemade, ensure it’s chilled and ready to go.
Using your chosen cutter, press down firmly to create as many circles as possible from each pie crust. You’ll likely have some scraps left over. Don’t toss those! You can gently press them together, re-roll them once (try not to overwork the dough), and cut out a few more circles. The number of mini pies you get will depend on the size of your cutter, but you should expect to yield around 12-18 mini pies from two crusts.
Once your circles are cut, carefully press each one into the wells of a standard 12-cup muffin tin. Gently coax the dough up the sides of the muffin cups, creating a little pocket for our delicious pumpkin filling. It’s important to make sure the crust comes up high enough to hold all the filling. If any of the dough tears, don’t worry – just patch it up with a bit of extra dough. Pricking the bottom of each crust with a fork a few times is a good idea to prevent puffing during baking, though for mini pies with a dense filling, this is less critical than with full-sized pies.
Making the Pumpkin Filling
Now for the star of the show: the pumpkin filling! In a medium-sized mixing bowl, combine the dry ingredients: the brown sugar, granulated sugar, pumpkin pie spice, and salt. Whisk them together until they are well combined. This ensures that the spices and sugars are evenly distributed throughout the filling, leading to a consistent flavor in every bite.
Next, add the canned pumpkin puree to the bowl. Remember, it’s crucial to use pure pumpkin puree and not pumpkin pie filling, as the latter already contains sweeteners and spices, which would throw off the balance of our recipe. Now, add the evaporated milk, the large egg, and the vanilla extract.
Using a whisk or an electric mixer on low speed, beat the ingredients together until the mixture is smooth and creamy. You want to ensure there are no lumps of pumpkin or undissolved sugar. The mixture should have a lovely, rich orange hue and a thick, pourable consistency. Take a moment to inhale that wonderful aroma – it’s the scent of autumn bliss!
Filling and Baking the Mini Pies
With our crusts prepared and our filling ready, it’s time to bring them together. Carefully spoon the pumpkin filling into each of the prepared pie crusts in the muffin tin. Fill them generously, but be careful not to overfill, as this can lead to overflow during baking. A good guideline is to fill them about two-thirds to three-quarters of the way full.
Now it’s time to bake! Preheat your oven to 375°F (190°C). Place the muffin tin in the preheated oven. We’re going to bake these for approximately 20-25 minutes. During this time, you’ll notice the filling puffing up slightly and the crust turning a beautiful golden brown.
Checking for Doneness
To check if your mini pumpkin pies are done, gently insert a knife or a toothpick into the center of one of the pies. If it comes out clean, or with just a few moist crumbs attached, they are ready. The center of the pies should be set, not jiggly. If you find that the crust edges are browning too quickly before the filling is set, you can loosely tent the muffin tin with aluminum foil. This will protect the edges from over-browning while allowing the center to cook through.
Cooling and Serving
Once baked to perfection, carefully remove the muffin tin from the oven. Allow the mini pumpkin pies to cool in the muffin tin for about 10-15 minutes. This initial cooling period helps them set up properly and makes them easier to remove. After this, you can carefully use a small offset spatula or a butter knife to gently loosen the edges and lift each mini pie out of the muffin tin. Place them on a wire rack to cool completely.
These mini pumpkin pies are absolutely delightful served warm or at room temperature. For the ultimate indulgence, top each one with a generous swirl of homemade whipped cream. The creamy, cool sweetness of the whipped cream perfectly complements the warm, spiced pumpkin filling. Enjoy these little bursts of fall flavor!
Conclusion:
I hope you enjoyed learning how to make these delightful mini pumpkin pies! They are truly a fantastic treat because they offer all the classic, comforting flavors of traditional pumpkin pie but in a perfectly portioned, individual size. This makes them incredibly convenient for parties, holiday gatherings, or just a cozy evening snack. The golden, flaky crust and the rich, spiced pumpkin filling are a match made in heaven, and the smaller size means you can enjoy one (or maybe two!) guilt-free.
These mini pumpkin pies are wonderfully versatile. Serve them warm or at room temperature. They are fantastic on their own, but a dollop of whipped cream, a drizzle of caramel sauce, or even a sprinkle of cinnamon adds an extra layer of deliciousness. For variations, consider adding a pinch of cardamom to the filling for a more complex spice profile, or try a pecan crumble topping for added crunch. I truly encourage you to give this recipe a try; it’s surprisingly easy and the results are incredibly rewarding. You won’t regret making these adorable and delicious treats!
Frequently Asked Questions:
Can I make the crust ahead of time?
Yes, absolutely! You can prepare the pie crust dough a day or two in advance and store it in the refrigerator. You can also pre-bake the mini pie shells a day ahead and store them at room temperature in an airtight container. Just be sure to fill and bake them on the day you plan to serve for the freshest taste and texture.
What if I don’t have mini pie pans?
No problem! You can use a standard muffin tin for this recipe. Simply grease and flour the muffin tin cups well, or use paper liners. You might need to adjust the baking time slightly, so keep an eye on them. Another option is to use ramekins or even create free-form mini pies by cutting out circles of dough and pressing them into small tart molds or shaping them by hand.
Mini Pumpkin Pies
Delicious individual pumpkin pies made with a classic spice blend and creamy filling.
Ingredients
-
2 (9-inch) refrigerated rolled pie crusts
-
1/3 cup brown sugar
-
2 tablespoons granulated sugar
-
1 1/2 teaspoons pumpkin pie spice
-
1/4 teaspoon salt
-
1 cup canned pumpkin puree
-
3/4 cup evaporated milk
-
1 large egg
-
1/2 teaspoon vanilla extract
-
Homemade whipped cream (for topping)
Instructions
-
Step 1
Preheat oven to 375°F (190°C). Unroll pie crusts and use a 3-4 inch round cutter to cut out 12 circles. -
Step 2
Press the crust circles into the cups of a standard 12-cup muffin tin. Prick the bottoms with a fork. -
Step 3
In a medium bowl, whisk together brown sugar, granulated sugar, pumpkin pie spice, and salt. -
Step 4
Add pumpkin puree to the sugar mixture and stir until well combined. -
Step 5
In a separate small bowl, whisk the egg and vanilla extract. Gradually whisk in the evaporated milk. -
Step 6
Pour the wet ingredients into the pumpkin mixture and stir until smooth. -
Step 7
Divide the filling evenly among the pie crusts in the muffin tin. -
Step 8
Bake for 20-25 minutes, or until the centers are set and the crust is golden brown. -
Step 9
Let cool in the muffin tin for 10 minutes before carefully removing to a wire rack to cool completely. Serve with whipped cream.
Important Information
Nutrition Facts (Per Serving)
It is important to consider this information as approximate and not to use it as definitive health advice.
Allergy Information
Please check ingredients for potential allergens and consult a health professional if in doubt.