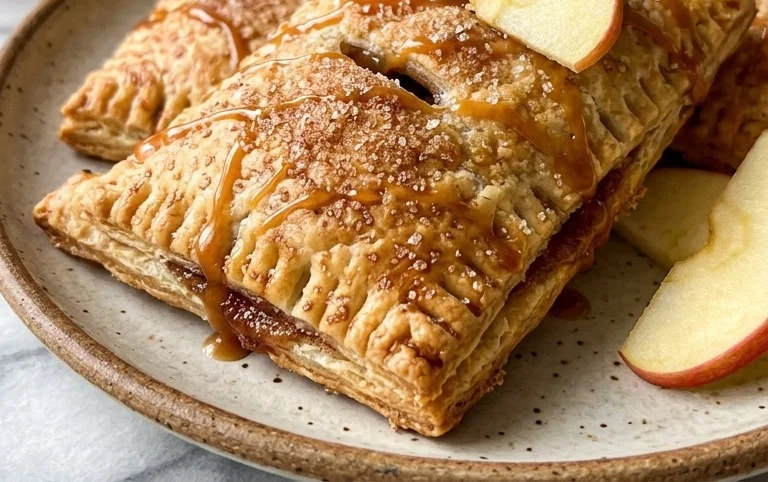
Easy Apple Hand Pies – Flaky & Spiced Delight
Apple hand pies are more than just a dessert; they’re a little pocket of pure joy! Imagine flaky, buttery pastry encasing warm, spiced apples, all perfectly portioned for an individual treat. Who doesn’t love that comforting combination? There’s something incredibly satisfying about holding a warm apple hand pie in your hands, the sweet aroma wafting up, and taking that first delightful bite. They’re the ideal portable indulgence, perfect for a picnic, a midday pick-me-up, or a sweet ending to any meal without the fuss of slicing a whole pie. What makes these little wonders so special is their inherent charm – they feel both rustic and elegant, a testament to simple ingredients coming together in a truly magical way. Get ready to bake up some happiness with this delightful recipe for apple hand pies!

Apple Hand Pies
There’s something undeniably comforting about a warm, flaky hand pie bursting with sweet, spiced apple filling. These delightful little pockets of joy are perfect for on-the-go snacking, impressive desserts, or even a sweet breakfast treat. Forget wrestling with a full-sized pie; hand pies are individual servings of pure happiness, and they’re surprisingly easy to make. Whether you’re a seasoned baker or just starting out, these apple hand pies are sure to become a favorite. They’re rustic, charming, and absolutely delicious.
Ingredients:
- 1 homemade pie crust recipe, (or 2 boxes of store-bought pie crust dough)
- 2 cups apple pie filling, (or 1 can (21 ounces) store-bought apple pie filling)
- vegetable oil, (for frying)
- 4 cups (250 g) confectioners’ sugar
- 5-7 tablespoons whole milk, (or more or less until glaze reaches your desired consistency, room temperature)
Instructions:
Preparing the Dough and Filling
The first step to our delicious hand pies is to get our dough and filling ready. If you’re using a homemade pie crust, ensure it’s chilled and ready to roll. If you’ve opted for store-bought, simply unroll the dough as per the package instructions. For the apple pie filling, whether homemade or store-bought, it’s important to have it at a good consistency. If it’s too watery, you might end up with soggy hand pies. You can gently simmer it for a few minutes to thicken it up, or even drain off any excess liquid. This small step can make a big difference in the final texture of your pies.
Assembling the Hand Pies
Now comes the fun part: assembling our hand pies! Lightly flour your work surface and your rolling pin. If you’re using a homemade crust, roll it out to about 1/8-inch thickness. If you’re using store-bought crusts, they’re usually ready to go. Using a round cutter (about 4-5 inches in diameter) or the rim of a bowl, cut out as many circles as you can from your dough. You’ll want to re-roll the scraps once to get a few more circles, but try not to overwork the dough. Place about 2 tablespoons of the apple pie filling onto one half of each dough circle, leaving a small border around the edge. Be careful not to overfill, as this can make sealing the pies difficult and increase the chance of the filling bursting out during cooking.
Sealing and Crimping the Pies
To ensure our delicious apple filling stays safely tucked inside, we need to seal the hand pies properly. Lightly brush the edges of the dough circles with a little water. This acts like glue, helping the dough to stick together. Carefully fold the unfilled half of the dough over the filling, creating a semi-circle. Press down firmly around the edges to seal. For an extra secure seal and a decorative touch, you can use the tines of a fork to crimp the edges. This not only prevents leakage but also gives our hand pies a lovely, rustic appearance. Make sure there are no gaps, especially where the two edges of dough meet.
Frying the Hand Pies
We’re going to fry our hand pies to achieve that irresistible golden-brown, crispy exterior. In a large, heavy-bottomed pot or Dutch oven, heat about 2-3 inches of vegetable oil over medium-high heat. The oil is ready when a small piece of dough dropped into it sizzles immediately and floats to the surface. Carefully, using a spatula or tongs, lower 2-3 hand pies into the hot oil at a time. Don’t overcrowd the pot, as this can cause the oil temperature to drop, resulting in greasy pies. Fry for about 2-3 minutes per side, or until they are beautifully golden brown and puffed up. Use a slotted spoon or spider strainer to remove the fried hand pies from the oil and place them on a wire rack set over a baking sheet to drain any excess oil. This allows air to circulate, keeping the bottoms from becoming soggy.
Making the Simple Glaze and Finishing Touches
While our hand pies are still warm (but not hot!), it’s time to add the final touch: a simple, sweet glaze. In a medium bowl, whisk together the confectioners’ sugar and the whole milk. Start with 5 tablespoons of milk and add more, a tablespoon at a time, until you reach your desired consistency. You want a glaze that’s thick enough to coat the pies but still pourable. It should be smooth and lump-free. Drizzle the glaze generously over the warm hand pies. The warmth of the pies will help the glaze spread slightly and set into a lovely, slightly hardened coating. You can also dip the tops of the pies directly into the glaze if you prefer a thicker coating. Allow the glaze to set for about 10-15 minutes before serving. Enjoy these warm, comforting apple hand pies!
Conclusion:
There you have it – a delightful recipe for homemade Apple Hand Pies that’s sure to become a new favorite! These charming pastries are incredibly versatile and offer a perfect balance of flaky, buttery crust and sweet, spiced apple filling. They’re fantastic because they’re portion-controlled, making them ideal for picnics, lunchboxes, or a simple, satisfying dessert. We love how easily they can be customized, allowing you to infuse your personality into every bite. Serve them warm, perhaps with a scoop of vanilla ice cream or a drizzle of caramel sauce for an extra touch of indulgence. Don’t be afraid to experiment with different spices like nutmeg or cardamom, or even add a handful of chopped pecans or walnuts to the apple filling for added texture and flavor. So, grab your apron and give these Apple Hand Pies a try – I guarantee you’ll be hooked!
Frequently Asked Questions:
Can I make the dough ahead of time?
Absolutely! The pie dough for these Apple Hand Pies can be made up to 2 days in advance and stored, tightly wrapped, in the refrigerator. Just let it sit at room temperature for about 15-20 minutes before rolling it out to make it more pliable.
What are some other fruit fillings I could use?
These hand pies are wonderfully adaptable! Besides apples, you could try a mixed berry filling, peach, cherry, or even a pear filling. Adjust the sugar and spices based on the sweetness of your chosen fruit.
Apple Hand Pies
Delicious homemade apple hand pies with a sweet glaze, perfect for a treat.
Ingredients
-
1 homemade pie crust recipe, or 2 boxes of store-bought pie crust dough
-
2 cups apple pie filling, or 1 can (21 ounces) store-bought apple pie filling
-
vegetable oil, for frying
-
4 cups (250 g) confectioners’ sugar
-
5-7 tablespoons whole milk, or more or less until glaze reaches your desired consistency, room temperature
Instructions
-
Step 1
Prepare your pie crust according to your recipe or unfold store-bought dough. -
Step 2
Cut out 6-inch circles from the pie crust dough. You should get about 12 circles. -
Step 3
Place about 2-3 tablespoons of apple pie filling on one half of each circle, leaving a small border. -
Step 4
Fold the other half of the dough over the filling and crimp the edges with a fork to seal. -
Step 5
Heat vegetable oil in a deep skillet or pot over medium-high heat. -
Step 6
Carefully fry the hand pies in batches until golden brown on both sides, about 2-3 minutes per side. -
Step 7
Remove pies from oil and place on a wire rack to drain. -
Step 8
While the pies are still warm, whisk together confectioners’ sugar and whole milk until a smooth glaze forms. Adjust milk for desired consistency. -
Step 9
Drizzle the glaze over the warm hand pies.
Important Information
Nutrition Facts (Per Serving)
It is important to consider this information as approximate and not to use it as definitive health advice.
Allergy Information
Please check ingredients for potential allergens and consult a health professional if in doubt.