Spooky Halloween Chocolate Chip Cookies – Ghoulishly Good
Halloween Chocolate Chip Cookies are more than just a treat; they’re a cherished tradition, a sensory explosion of spooky fun and comforting flavors that truly define the season. Who doesn’t get a thrill from that first warm, gooey bite, the rich chocolate melting on your tongue? We all have those memories tied to these delectable cookies – perhaps baking them with family, decorating them with playful Halloween themes, or sharing them with friends during a costume party. What makes these particular Halloween Chocolate Chip Cookies so special is the perfect balance of classic chocolate chip cookie goodness with a festive, ghoulish twist. They’re not just about taste; they’re about the magic they bring to our celebrations, transforming a simple cookie into a symbol of autumnal joy and Halloween excitement.
Get Ready for Spooky Deliciousness!
Unlocking the Secrets to Perfect Halloween Chocolate Chip Cookies
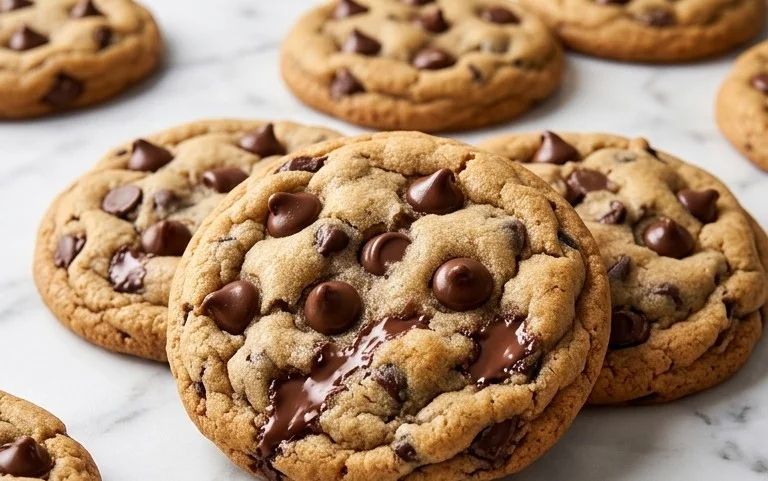
Spooky & Delicious Halloween Chocolate Chip Cookies
Get ready for some ghoulishly good fun in the kitchen! These Halloween Chocolate Chip Cookies are a classic favorite with a festive twist, perfect for trick-or-treaters, Halloween parties, or just a cozy night in. The secret to their irresistible flavor and perfect texture lies in a combination of simple ingredients and a little bit of love. We’re going to take our beloved chocolate chip cookie recipe and inject it with some Halloween spirit using fun sprinkles and optional candy eyes for an extra dose of personality. These cookies are guaranteed to be a hit with kids and adults alike, bringing smiles and satisfying sweet cravings all season long. So, let’s dive into the magic of creating these delightful treats!
Ingredients:
- 1/2 cup unsalted butter (melted)
- 1/3 cup granulated sugar (67 g)
- 1/2 cup packed light brown sugar (100 g)
- 1 large egg
- 1 teaspoon vanilla extract
- 1/2 teaspoon salt
- 1/2 teaspoon baking soda
- 1 1/2 cups all-purpose flour (spooned and leveled, 186g)
- 1 1/2 cups chocolate chips
- 1/2-3/4 cup Halloween sprinkles
- Candy eyes (optional)
Creating the Spooky Dough
1. **Creaming the Sugars and Butter:** Start by grabbing a large mixing bowl. Pour in the 1/2 cup of melted unsalted butter. To this, add the 1/3 cup of granulated sugar and the 1/2 cup of packed light brown sugar. The brown sugar is crucial here, as it adds moisture and a wonderful chewy texture to our cookies, along with that classic caramel-like flavor we all adore. Use a whisk or an electric mixer on medium speed to cream these ingredients together until the mixture is smooth and well combined. You want a light, fluffy consistency, which usually takes about 1-2 minutes. Don’t rush this step; it’s foundational for the cookie’s final texture.
2. **Adding the Wet Ingredients and Flavor:** Once your sugar and butter mixture is beautifully creamed, it’s time to introduce the egg and vanilla extract. Crack the large egg directly into the bowl. Add the 1 teaspoon of vanilla extract – this little touch of pure vanilla goodness enhances all the other flavors in the cookie and adds that comforting aroma we associate with homemade baked goods. Beat everything together until just combined. Don’t overmix at this stage; we’re just incorporating the wet ingredients.
3. **Combining the Dry Ingredients:** In a separate, medium-sized bowl, whisk together the 1 1/2 cups of all-purpose flour, 1/2 teaspoon of salt, and 1/2 teaspoon of baking soda. It’s important to spoon and level your flour to ensure you don’t end up with too much, which can make your cookies dry and tough. Whisking the dry ingredients together helps to distribute the salt and baking soda evenly, ensuring your cookies rise properly and have a balanced flavor. The salt, in particular, plays a vital role in enhancing the sweetness of the chocolate chips and the overall cookie dough.
4. **Bringing It All Together:** Now, gradually add the dry ingredients to the wet ingredients in your large mixing bowl. Mix on low speed or stir with a sturdy spoon until just combined. Be careful not to overmix the dough at this point. Overmixing can develop the gluten in the flour too much, resulting in tougher cookies. You should still see a few streaks of flour; that’s perfectly fine, as the chocolate chips and sprinkles will help to further incorporate everything. This is where the magic starts to happen, and the dough transforms into something truly delicious.
5. **Incorporating the Halloween Goodies:** This is the fun part where we make these cookies Halloween-ready! Gently fold in the 1 1/2 cups of chocolate chips. Use a spatula or your hands to distribute them evenly throughout the dough. Next, it’s time for the festive sprinkles! Add your 1/2 to 3/4 cup of Halloween sprinkles to the dough. You can use a mix of orange, black, purple, and green for a classic spooky palette, or choose whatever festive colors make you happy. Gently fold them in until they are mostly distributed. If you’re opting for the candy eyes, you can either mix some directly into the dough or, more effectively, press them onto the cookies after scooping them onto the baking sheet.
Baking Your Spooky Delights
Preheat your oven to 375 degrees Fahrenheit (190 degrees Celsius). Line baking sheets with parchment paper or silicone baking mats. This step is crucial for easy cleanup and prevents your cookies from sticking.
Using a cookie scoop or two spoons, drop rounded tablespoons of dough onto the prepared baking sheets, leaving about 2 inches between each cookie to allow them to spread. If you’re using candy eyes, now is the time to gently press them onto the tops of the cookie dough balls, giving them a fun, spooky face. You can arrange them to look like they’re staring, blinking, or even peeking out from the chocolate chips.
Bake for 9 to 11 minutes, or until the edges are lightly golden brown and the centers are still slightly soft. The cookies will continue to set up as they cool. For a chewier cookie, aim for the shorter end of the baking time. For a crispier cookie, bake a minute or two longer.
Once baked, let the cookies cool on the baking sheets for 5 minutes before transferring them to a wire rack to cool completely. This resting period is important as the cookies are fragile when they first come out of the oven.
Enjoy your delightfully festive and incredibly tasty Halloween Chocolate Chip Cookies! They’re perfect for sharing (or not!).

Conclusion:
So there you have it – your guide to creating the most spooktacular Halloween Chocolate Chip Cookies! This recipe is a winner because it’s incredibly easy to follow, even for beginner bakers, and the results are consistently delicious. The perfect balance of chewy centers and slightly crisp edges, loaded with melt-in-your-mouth chocolate chips, makes these cookies an irresistible treat for any Halloween gathering or just a fun autumn bake. They’re not just visually festive, but they taste absolutely divine!
I love serving these warm from the oven, perhaps with a cold glass of milk, but they’re also fantastic for packing into lunchboxes or sharing at school events. Don’t be afraid to get creative with your decorations! Sprinkling them with edible glitter, drizzling with orange or black icing, or even adding candy eyeballs can elevate these Halloween Chocolate Chip Cookies to a whole new level of festive fun.
I really encourage you to give this recipe a try. It’s guaranteed to be a hit with kids and adults alike, and the joy of baking these with loved ones is truly part of the Halloween spirit. So preheat your ovens, grab your ingredients, and let’s get baking!
Frequently Asked Questions:
How can I make these cookies extra festive for Halloween?
Beyond the classic chocolate chips, you can use Halloween-themed sprinkles, add some orange or black food coloring to the dough before baking, or press candy eyeballs into the dough just before it goes into the oven. A simple drizzle of melted white chocolate tinted orange or black after baking also adds a wonderful touch!
Can I make these cookies ahead of time?
Absolutely! You can prepare the dough and portion it into balls, then freeze them on a baking sheet until firm. Once frozen, transfer them to an airtight container and store them in the freezer for up to 3 months. When you’re ready to bake, just place the frozen dough balls directly onto a baking sheet and bake for a few minutes longer than the original recipe states. They also keep well at room temperature in an airtight container for 2-3 days after baking.
Halloween Chocolate Chip Cookies
Spooky and delicious chocolate chip cookies adorned with festive Halloween sprinkles and candy eyes, perfect for any Halloween celebration.
Ingredients
-
1/2 cup unsalted butter (melted)
-
1/3 cup granulated sugar ((67 g))
-
1/2 cup packed light brown sugar ((100 g))
-
1 large egg
-
1 teaspoon vanilla extract
-
1/2 teaspoon salt
-
1/2 teaspoon baking soda
-
1 1/2 cups all-purpose flour (spooned and leveled (186g))
-
1 1/2 cups chocolate chips
-
1/2-3/4 cup halloween sprinkles
-
candy eyes (optional)
Instructions
-
Step 1
Preheat oven to 375°F (190°C). Line baking sheets with parchment paper. -
Step 2
In a large bowl, whisk together the melted unsalted butter, granulated sugar, and packed light brown sugar until well combined. -
Step 3
Beat in the large egg and vanilla extract until smooth. -
Step 4
In a separate bowl, whisk together the all-purpose flour, salt, and baking soda. -
Step 5
Gradually add the dry ingredients to the wet ingredients, mixing until just combined. Do not overmix. -
Step 6
Stir in the chocolate chips. Gently fold in the Halloween sprinkles. -
Step 7
Drop rounded tablespoons of dough onto the prepared baking sheets, about 2 inches apart. If using, press candy eyes onto the tops of the cookies before baking. -
Step 8
Bake for 9-11 minutes, or until the edges are golden brown and the centers are still slightly soft. -
Step 9
Let the cookies cool on the baking sheets for a few minutes before transferring them to a wire rack to cool completely.
Important Information
Nutrition Facts (Per Serving)
It is important to consider this information as approximate and not to use it as definitive health advice.
Allergy Information
Please check ingredients for potential allergens and consult a health professional if in doubt.