Easy No Bake Peanut Butter Granola Cups Recipe
No Bake Peanut Butter Granola Cups are about to become your new go-to treat! Are you craving something sweet, satisfying, and ridiculously easy to make? Then you’ve landed in the right place. These delightful little cups are the perfect marriage of crunchy granola and creamy peanut butter, all held together in a melt-in-your-mouth chocolate shell. It’s no wonder why people absolutely adore them – they’re quick to whip up, require zero oven time, and deliver an explosion of flavor and texture with every bite. What truly makes these No Bake Peanut Butter Granola Cups special is their incredible versatility; you can customize them with your favorite add-ins and they’re always a crowd-pleaser, whether for a quick snack, a healthy-ish dessert, or even a delightful breakfast on the go. Get ready to impress yourself and everyone else with these effortlessly delicious creations!
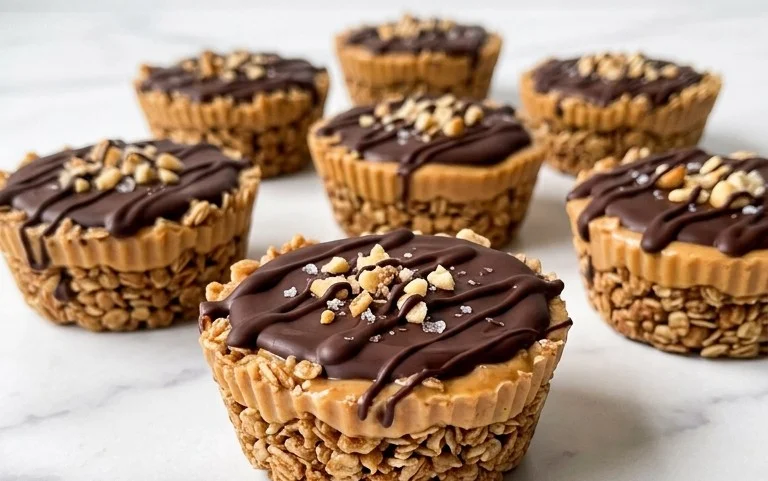
No Bake Peanut Butter Granola Cups: Your New Favorite Easy Treat
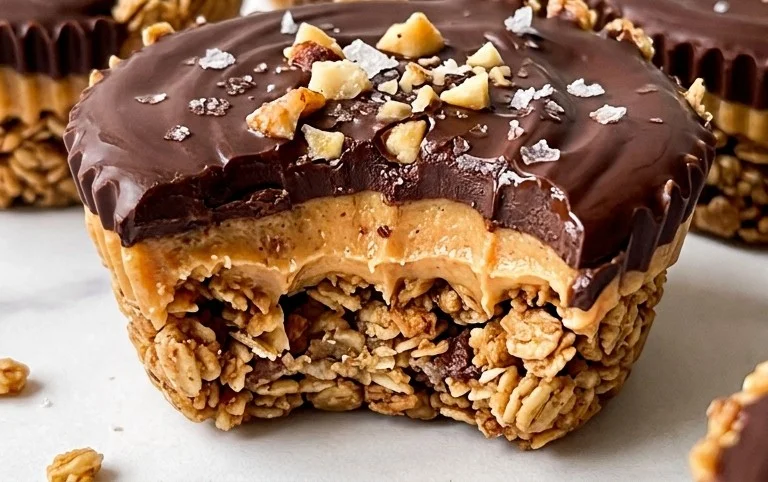
Are you craving a delicious, satisfying treat that requires absolutely zero oven time? Look no further! These No Bake Peanut Butter Granola Cups are a game-changer. They’re incredibly simple to whip up, packed with flavor, and perfect for those moments when you need a sweet pick-me-up without a lot of fuss. Imagine a delightful crunchy granola base, bound together with creamy peanut butter, all enrobed in a rich, dark chocolate shell. Sounds divine, right? The best part is, you can customize them to your heart’s content. Add some flaky sea salt on top for a salty-sweet punch, or perhaps a drizzle of extra melted peanut butter. These cups are perfect for a quick snack, a party treat, or even a delightful homemade gift for your favorite peanut butter lovers. Let’s get started!
Ingredients:
- 2 ½ cups granola
- 1 cup peanuts-chopped
- 3 Tablespoons peanut butter
- 3 Tablespoons honey (or more if needed)
- 1 cup peanut butter-melted
- Topping:
- 12 oz. dark chocolate-finally chopped
- 1 Tablespoon coconut oil
Crafting the Granola Base
The foundation of these delightful cups is a wonderfully textured granola mixture. This is where the magic begins, and it’s surprisingly easy. You’ll want to make sure your granola is a good quality one with a texture you enjoy – something with a nice crunch is ideal! The chopped peanuts will add an extra layer of nutty flavor and a satisfying bite, complementing the sweetness of the honey and the richness of the peanut butter. The initial binding agent for this mixture will be the creamy peanut butter and honey.
Step 1: Combining the Dry Ingredients
In a medium-sized mixing bowl, combine your 2 ½ cups of granola and 1 cup of chopped peanuts. Give this a good stir to ensure the peanuts are evenly distributed throughout the granola. This is your crunchy canvas, ready to be transformed. Think of it as building the exciting textural element of our cups. Make sure the peanuts are chopped to a size that will be enjoyable to bite into – not too big, not too small. This ensures a consistent texture in every single bite.
Step 2: Creating the Peanut Butter Binder
Now, add 3 tablespoons of your regular peanut butter (the creamy, spreadable kind) to the bowl with the granola and peanuts. Follow this with 3 tablespoons of honey. If you find your granola mixture is a bit dry or you prefer a sweeter, more cohesive base, don’t hesitate to add a little more honey, a tablespoon at a time, until it reaches a consistency where it clumps together when squeezed. You want it moist enough to hold its shape but not so wet that it becomes sticky and difficult to work with. Gently fold everything together with a spatula or your hands until the granola, peanuts, peanut butter, and honey are thoroughly combined. You should be able to press a bit of the mixture between your fingers and have it hold its shape. This is the crucial step for ensuring your cups don’t crumble apart!
Forming the Cups
Once your base is perfectly mixed, it’s time to shape these delicious bites. This step is all about creating that iconic cup shape, ready to be filled with our luscious chocolate topping.
Step 3: Pressing the Base into Muffin Liners
Line a standard muffin tin with 12 paper or silicone muffin liners. Spoon about 1.5 to 2 tablespoons of the granola mixture into each liner. Using the back of your spoon or your fingers, press the mixture firmly into the bottom and up the sides of the liners to create a cup shape. You’re essentially forming a little edible bowl. The firmer you press, the more stable your cups will be. Pay attention to building up the sides evenly; this will create a nice rim for the chocolate to set against. Don’t worry if they aren’t perfectly uniform – rustic charm is part of their appeal!
The Luscious Chocolate Coating
The crowning glory of these no-bake cups is the rich, decadent chocolate shell. This is where things get truly indulgent!
Step 4: Melting the Chocolate and Coconut Oil
In a microwave-safe bowl, combine the 12 ounces of finely chopped dark chocolate and 1 tablespoon of coconut oil. Microwave in 30-second intervals, stirring well after each interval, until the chocolate is smooth and completely melted. Be patient with this step; you don’t want to overheat the chocolate. The coconut oil helps to make the chocolate smooth and gives it a nice sheen once set. Alternatively, you can melt the chocolate and coconut oil using a double boiler. Stir it continuously until it’s beautifully glossy and free of lumps. A smooth chocolate coating is key to that professional-looking finish and delightful mouthfeel.
Step 5: Filling and Chilling the Cups
Once the chocolate is melted and smooth, carefully spoon about 1 tablespoon of the melted chocolate into the bottom of each granola cup, spreading it slightly to cover the base. Then, spoon the remaining melted chocolate over the top of the granola mixture, ensuring the granola is completely covered and sealed within the chocolate. You can even drizzle a little extra chocolate over the top for an artistic touch. Place the filled muffin tin into the refrigerator for at least 1-2 hours, or until the chocolate is completely set and firm. This chilling period is essential for the cups to hold their shape and for the chocolate to harden properly. For an extra touch of flair, once the chocolate has set, you can add a tiny sprinkle of flaky sea salt on top of each cup right before serving.
Enjoy your homemade No Bake Peanut Butter Granola Cups! They are best stored in an airtight container in the refrigerator.
Conclusion:
And there you have it – the delightfully simple, incredibly satisfying No Bake Peanut Butter Granola Cups! I truly hope you give this recipe a try because it’s a game-changer for those moments when you crave a sweet treat without the fuss of turning on the oven. The perfect balance of crunchy granola and creamy peanut butter, all held together by a touch of sweetness, makes these cups an absolute winner. They’re fantastic for a quick breakfast on the go, a healthy-ish dessert, or even an afternoon pick-me-up. Feel free to get creative with your toppings – think mini chocolate chips, a sprinkle of sea salt, or even some shredded coconut. Don’t be afraid to experiment and make these your own! I’m confident you’ll find them as addictive as I do.
Frequently Asked Questions:
Can I make these vegan?
Absolutely! To make these No Bake Peanut Butter Granola Cups vegan, simply swap the honey for maple syrup or agave nectar. Ensure your granola is also vegan-friendly, as some varieties can contain honey.
How long do these cups last?
Stored in an airtight container in the refrigerator, these delightful cups will stay fresh for about a week. They tend to firm up even more in the fridge, making them perfectly bite-sized.
Can I use a different nut butter?
Yes, you can! While peanut butter is the star, feel free to substitute it with almond butter, cashew butter, or even sunflower seed butter for a nut-free option. The texture might vary slightly, but the deliciousness will remain!
No Bake Peanut Butter Granola Cups
Easy no-bake granola cups with a peanut butter and chocolate swirl, perfect for a quick treat.
Ingredients
-
2 ½ cups granola
-
1 cup peanuts-chopped
-
3 Tablespoons peanut butter
-
3 Tablespoons honey (or more if needed)
-
1 cup peanut butter-melted
-
12 oz. dark chocolate-finally chopped
-
1 Tablespoon coconut oil
Instructions
-
Step 1
In a large bowl, combine the granola, chopped peanuts, 3 tablespoons of peanut butter, and 3 tablespoons of honey. Mix until well combined, adding more honey if needed to help it stick together. -
Step 2
Press about 2 tablespoons of the granola mixture into the bottom of each cup of a mini muffin tin lined with paper liners. -
Step 3
In a separate bowl, melt the 1 cup of peanut butter. You can do this in the microwave in 30-second intervals, stirring in between, or over a double boiler. -
Step 4
Spoon about 1 tablespoon of the melted peanut butter over the granola base in each cup. -
Step 5
In a microwave-safe bowl, melt the dark chocolate with the coconut oil. Microwave in 30-second intervals, stirring after each, until smooth. -
Step 6
Pour the melted chocolate mixture over the peanut butter layer in each cup, filling to the top. -
Step 7
Place the muffin tin in the freezer for at least 30 minutes, or until firm. -
Step 8
Once set, remove the granola cups from the muffin tin and store in an airtight container in the refrigerator.
Important Information
Nutrition Facts (Per Serving)
It is important to consider this information as approximate and not to use it as definitive health advice.
Allergy Information
Please check ingredients for potential allergens and consult a health professional if in doubt.